Thursday, June 30, 2011

build: work-in-progress: island terrain

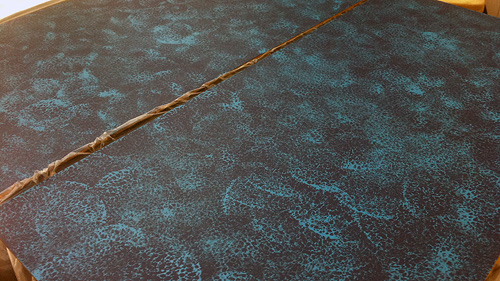
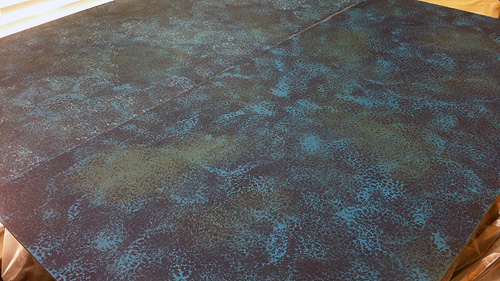
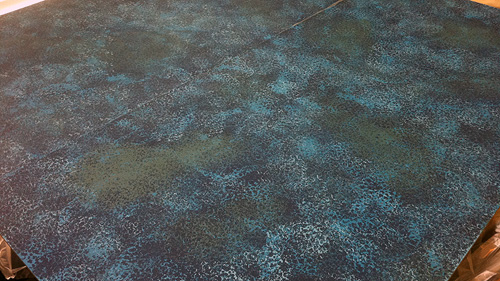
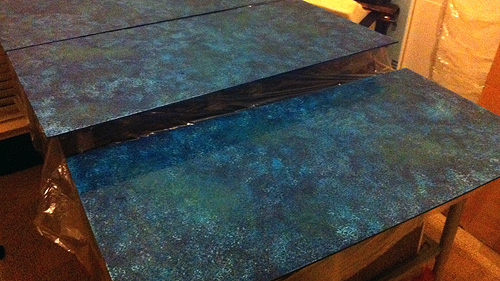
While waiting for the sea table to cure, I finally opened my Woodland Scenics Hot Wire Foam Cutter and got to work on some insulation foam I swiped from my little brother years ago. The plan is to make a series of island chains to act as terrain for the table. The initial batch is for learning purposes and I'll be happy if it simply looks pretty while blocking movement and line of sight.

The first set of islands, cut to size and glued to clear acrylic sheet:


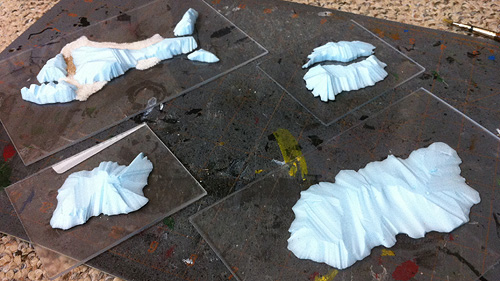
"The Floating Forests" and Candiru Island

These are designed to be lush with three of the four having no real beach. I'll be pattering their flora and waterlines after these:


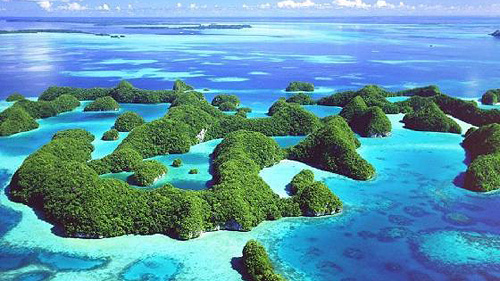
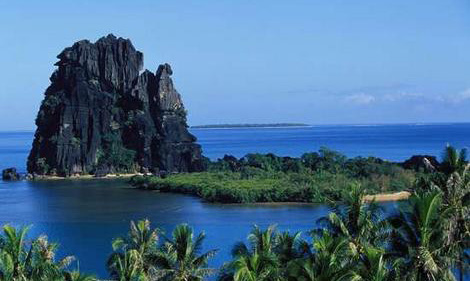
The second set of islands are practically the polar opposite, having their coloring and shapes inspired by the tall rock formation in this photo:


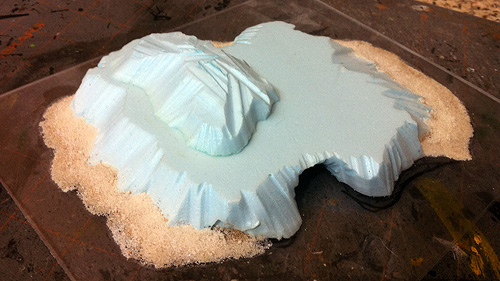
Here's what they look like so far:


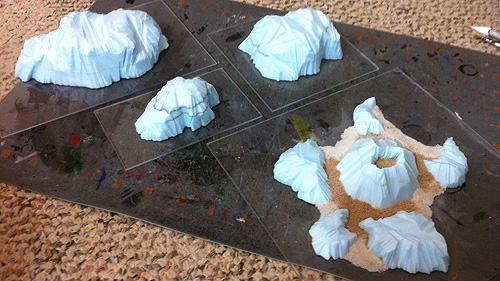
"The Barren Mountains" & Sleeping Turtle Island

The plan is to start with a charcoal grey paint, stipple on some blacks, deep reds and/or browns, then drybrush with two-to-three increasingly lighter greys. I've no idea if it'll work, but I look forward to finding out.

Each island chain has a distractingly obvious center-piece island shaped like an aquatic animal. Oddly enough, neither island started as a conscious effort to make an animal. Instead, they were inspired by placing randomly cut foam shapes next to each other, then trimming to more clearly evoke the animal in my head. They're a fun piece of kit that I plan to continue with each new island chain I make.


Candiru Island


Sleeping Turtle Island

Each island's first goal is to blend well with their respective island chains. However, I hope to cross pollinate enough features between them that they'll tie to each other as well.

If all eight of these islands go well, I've already got plans for inhabited islands with the potential for in-game effects. I may have already begun work on one...


You sure that's cave?

Wednesday, June 29, 2011

paint: fsa navy (dystopian wars)

Was listening to D6G: The Lost Chapters - Book 3 the other evening and the topic turned to keeping track of paint recipes for your forces. I fired an email off to Craig and Russ detailing my latest technique for such things, and figured I could relate it here as well. It's quick, easy, and accessible to almost everyone thanks to the now ubiquitous cell phone camera!

After each new paint, wash, or glaze you simply pose the model next to the paint pot you just used, making sure that you can clearly see the color's name and where you've painted. Snap a picture. Not only has your picture "written down" what paint you used, but also where to place it on your model. String enough of those together and you've got a ready-made recipe for making your second, third, or eleventy-first wave of troops match the first. This method has served me well with models for MERCS, 40K and now Dystopian Wars.

For example, here are the pics I took for my FSA Navy:


Step 1: Tausept Ochre: applied to decking


Step 2: Orkhide Shade: applied to hull, turrets and superstructure


Step 3: Knarloc Green: over Step 2, leaving leaving Orkhide Shade in recesses


Step 4: Gryphonne Sepia: over everything painted so far


Step 5: Tin Bitz & Boltgun Metal: to the boilers and pipes


Step 6: Badab Black: to the Boltgun metal


Step 7: Shining Gold: over the Tin Bitz, leaving Tin Bitz in the recesses


Step 8: Dheneb Stone: to the interior of individual wood planks


Step 9: Ogryn Flesh: over the Tin/Gold areas


Step 10: Gryphonne Sepia: back over the decking


Step 11: Badab Black: second coat over the Boltgun Metal


Step 12: Gretchin Green: edge highlighting to the green areas

And that's it! The best part of this technique is that most of us tech-saavy enough to blog or listen to podcasts probably have a cell phone in our pocket capable of taking even mediocre pictures. These pics are destined for personal use, not Cool Mini or Not, so mediocre is fine as long as you can make out the color's name and where you put it on the model.

The hardest part, for me, is remembering to stop between steps and snap the shot. I personally find it easier to take pictures when I'm doing test or proof-of-concept models, as I'm already stopping to figure out the next color to apply.

I doubt I'm the first to use this technique, but it is something I came up with on my own, haven't seen anywhere else on the net, and have found invaluable since I started using it. Hopefully it'll be useful to some of you out there on the interwebs as well.

Sunday, June 26, 2011

build: sea table

One of the great things about being so enamored with Dystopian Wars is that it gives me the chance to build the sea table I never got around to with Uncharted Seas. A couple weeks ago, I went shopping for supplies.


Home Depot:
3 sheets of 2'x4' 1/4" MDF board (not pictured)
8oz. paint tester of Glidden's "Rich Navy"
8oz. paint tester of Glidden's "Caribbean Sea"
8oz. paint tester of Glidden's "Totally Teal"
8oz. paint tester of Glidden's "Sea Spray"

Hobby Lobby
1 large sponge (not pictured)
1 bottle of Liquitex Ink! "Prussian Blue Hue"

Lowe's
1 quart Famowood Clear Coat Epoxy

Already had
paper towels
paint roller

All told, I spent a about $65 on new stuff for the table. I found this quite cheap, considering one-third of the cost was epoxy! With supplies in hand, it was time to start on the table.


Step 1: Rich Navy

The Rich Navy was applied evenly to all three boards using a roller brush. This used up practically all of the sample pot.


Step 2: Prepare Sponge

Following the instructions on the sponge's packaging, the sponge was dampened before applying any paint. Never use paint on a dry sponge. It'll just gum up your sponge.


Step 3: Caribbean Sea

The Caribbean Sea paint stippled randomly all over the board, rotating the sponge as needed to keep from having any obvious patterns emerge. I used the flat-face of the sponge for this step, which is why there are so many hard/obvious edges noticeable in the picture above. That's okay for this step, as the next two layers will break that up a bit.


Step 4: Totally Teal

I flipped the sponge over to the rounded side and stippled the teal in randomly placed thick clumps across each board. I then went back and added the occasional diffuse, light-handed stippling over the rest of the board.


Step 5: Sea Spray

Again using the rounded side, I stippled my lightest blue in diffuse patters all over the board. As you can see in the picture, I tended to shy away from the middle of the teal clumps, but usually encroach on the edges of teal's territory. This is your brightest color and most likely to look like cresting waves, so flavor to taste remembering you can always add more as needed, but taking paint away is a royal pain.


Step 6: Glaze Coat

The epoxy was mixed using 3 oz. of each component part and 5-6 drops of the Liquitex Ink! per board. The glaze coat was applied using the technique seen [url=http://www.youtube.com/watch?v=uVrKhu9_Wxo]here[/url]. Once this step is completed, there's nothing to do but sit back, relax, and let the resin cure over the next 72 hours!

In the interest of full disclosure, I did do a test run or two before starting in on the tables in earnest. Despite the cheap cost of most of the components, I didn't want to screw up a full-size board and have to start over. Small, flat pieces of scrap wood allowed me to experiment with paint ratios and stippling techniques using the sponge. Once I had that down, practiced with small, half-to-one ounce batches of the glaze coat to figure out that process. Personally, I find that a thick application of glaze stippled with towel looked FAR more wave-like than a thin application.

PRO TIP!: You're likely to get bubbles when mixing AND stippling the glaze coat. To ward off the former, simply slow down your stirring. For the latter, exhale over the bubble(s). If they're near the surface, the CO2 from your breath will react with the resin to pop the bubble.

Oh, one last thing! The glaze is easily the most expensive single component of the build and I was a little worried that a quart wouldn't be enough to cover the table. The box says it covers 8 square feet at 1/8" deep. Don't let this concern you. As you can see from the first pic in this post, I've still got about 1/4 of the glaze leftover after finishing. I feel confident saying you could easily cover 8'x4' of board with the quart, and could possibly stretch it to cover 10'x4' if you didn't waste any on testing your technique.

I'll try to get some more comprehensive shots showing off the glaze this week after I know that it's fully cured. Tests at 24 hours showed it to still be a little tacky.

Thursday, June 23, 2011

paint: fsa fleet (dystopian wars)

Since coming back from Adepticon 2011, I've taken a break from 40K by slowly and steadily working on my FSA forces for Dystopian Wars. I started with the FSA box set and carrier, though the carrier's since been pushed to the backburner. By the time I got to it, I was sick of painting ship hulls. I'll probably tag-team it with the Dreadnaught when I get one. Currently painting up the five bombers when I'm not working on terrain (see below), though I'm not as enthused about them as I was the Lee Scoutships (both in game and aesthetically). The airships are just so damn cool.


FSA Navy Fleet with Air Corp attachments


FSA Navy Battleship


FSA Navy Frigates


FSA Navy Cruisers


FSA Air Corp Fighters


FSA Air Corp Bombers


FSA Air Corp Lee Scoutships


I plan to go back and add free-hand embellishments to all of 'em in the form of FSA and/or squadron identifiers. I just have to figure out how I want to do it first. I've been inspired by several different techniques used on this forum and am having trouble picking which one(s) to use.

I've also begun work on terrain, the start of which you can see beneath the ships. I've got three 2' x 4' sheets of 1/4" MDF done up with the stippled-sponge technique made famous here. Have some test patches of glass-coat curing to see which application method I like the best. This time to tomorrow I expect to have that sorted out and hope to slather the boards in resin over the weekend.

I've also begun testing out a foam cutter and sketching up various islands and sandbars to break things up. My goal is to have a fully-playable Dystopian Wars game board in-house by end of summer. Then I can start back on either an Iron Warriors or Badab War force for Adepticon 2012's Combat Patrol.