Saturday, August 4, 2012

build: mobile frame zero: miscellaneous frames

I've been absent for awhile. No excuses, just explanations.

After Adepticon 2012, I was burned out on 40K. Some of that may have had to do with how poorly I behaved myself Saturday evening, some of that may have had to do with an impending rules revision, who knows. Either way, I've spent far more time on getting fit than hobby of late. I'm not sorry for that, I feel the best I've felt in my life, but I do feel bad for not blogging what hobby progress I've had.

For a brief period I was completely infatuated with Dust Warfare, and I'll definitely post pics when I get back to it, but most of my hobby energy of late has been consumed by Mobile Frame Zero: Rapid Attack. I was one of the Kickstarter backers back in April, but it took inheriting decades worth of LEGO bricks from my little brother (some of which I and my cousins had passed down to him) to get me really going.

After a couple weeks sorting through two huge tubs of LEGO bricks, I started building. My first creation was inspired by the Mobile Frame Hangar "Frame Chef" challenge for July. I think it's far too animalistic for the setting, but think it's a pretty neat little creation.


IF Beetle


NDI "Soldier"

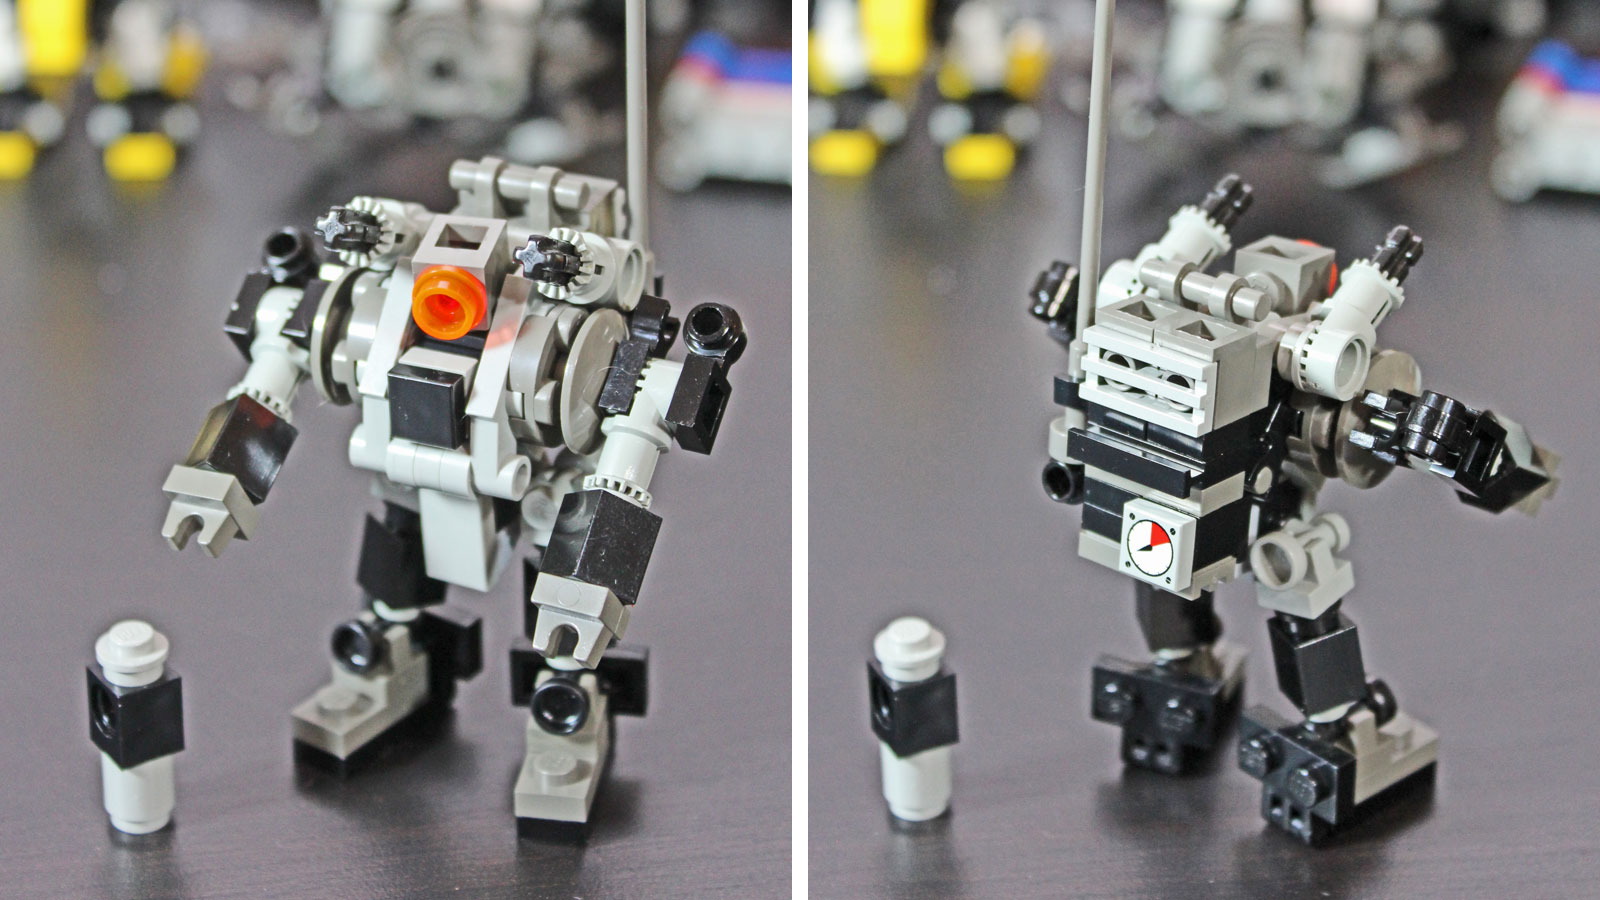
The "Soldier" torso was also crafted with July's Frame Chef part firmly in mind. I think it's both a better fit for the universe and a better springboard for future tinkering. The legs are cribbed heavily from Soren's "Conscript" and "Commissar" design (which we'll see again soon), but the torso/hip attachment is a bit flimsy. The shoulder connections could use some shoring up as well. I plan to revisit this one soon, replacing the arms with massive guns and possibly sticking it on a tracked or wheeled base.


451st Militia

When I saw Soren's Conscript and Commissar frames, I knew I'd be building some. The design just clicks with me, so I built up four with parts on hand. There are a few minor aesthetic tweaks (backpacks, feet) to lend unit cohesion, but they're mostly stock. I'm still figuring out what systems I want to put on these guys, but I do know I want dual flame-throwers. His weapons and backpack are of my own design, and I love how they work with the "Come at me bro" stance.

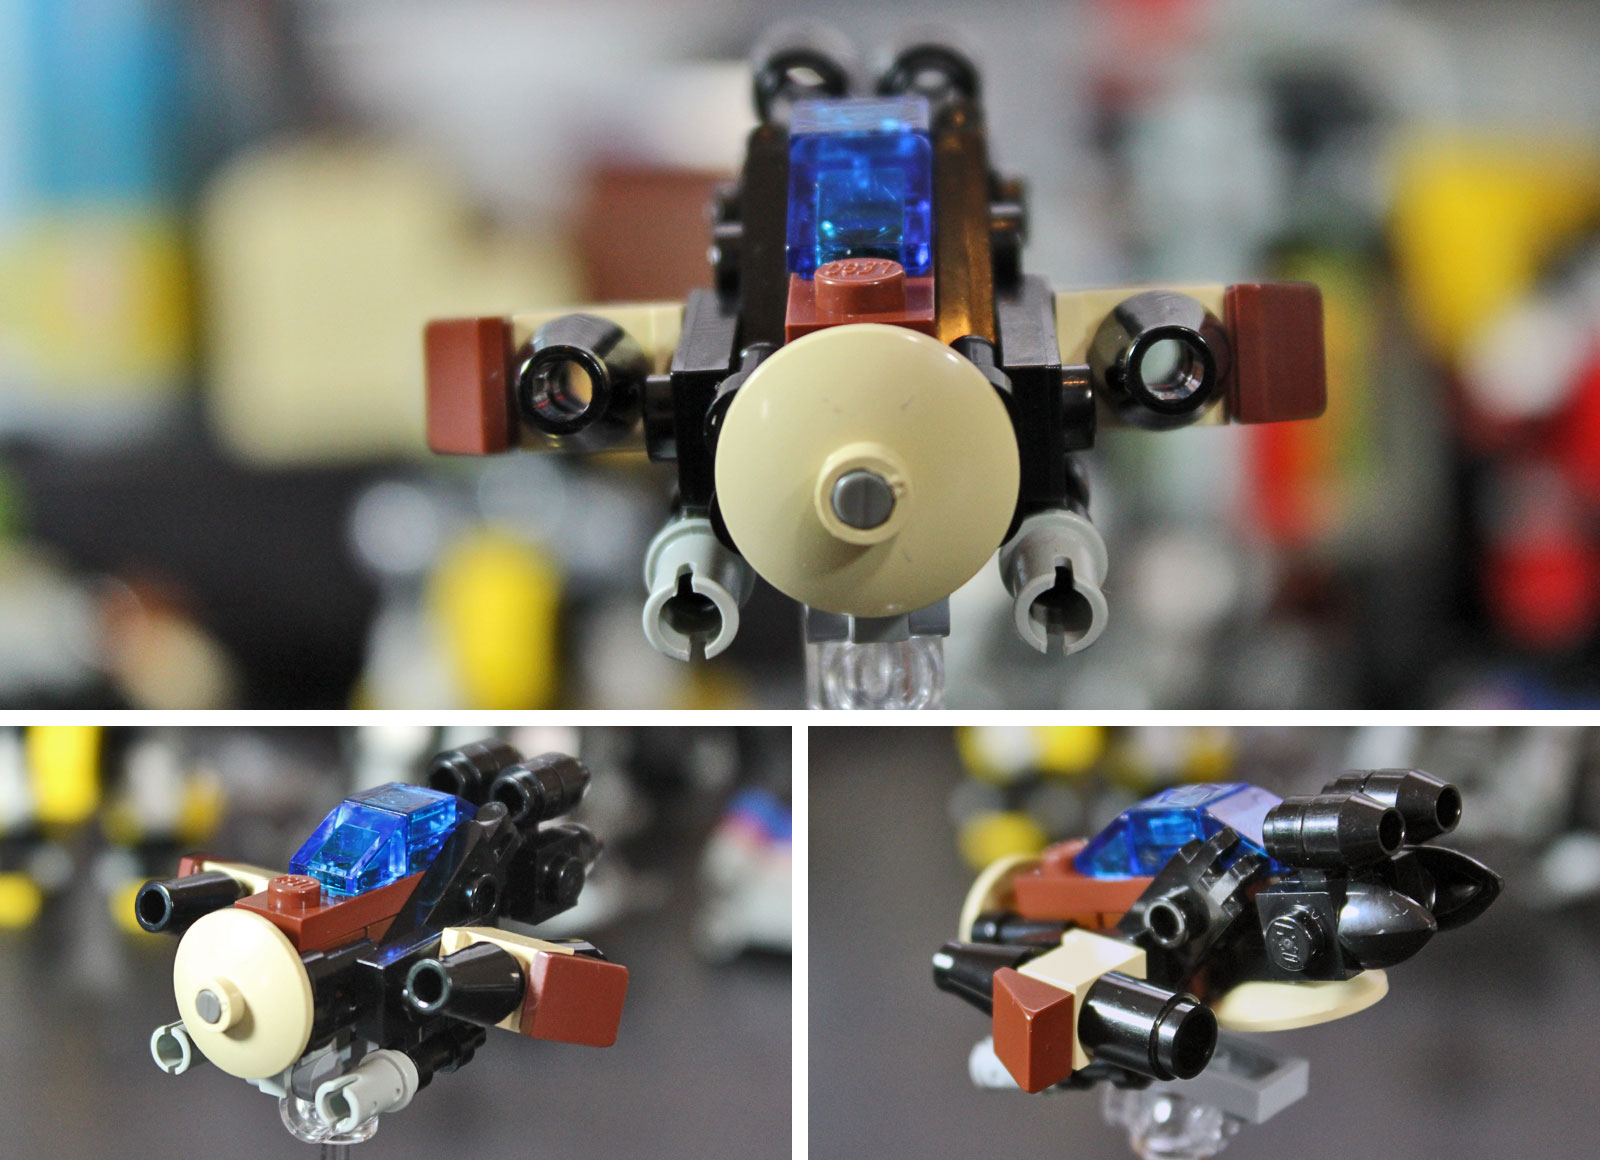
The twins' napping and me dinking around with bricks ended up with this little scout flyer that looks like it'd fit in pretty well with Soren's Ijad forces. I even went so far as to come up with some in-game fluff to tie it in to the MF0 universe.


Ijad "Screamer"

Designed as mechanical version of the the songbirds that congregate near Ijad villages on Celial, the "Screamer" is a small, light craft that uses specially tuned sensor and communication systems to scout ahead and alert Ijad frames to danger. The usually melodic songbirds, frequently ridden by young Ijad to experience the freedom of flight, get their name from the high-pitched, extra-sensory wail they emit when predators lurk near.

While in a "tiny aircraft" mode, I made a human flyer as well.


M&S Industries' A47 "Thunderbolt"

Borrowing its name from ground attack craft of yore, the M&S Industries' A47 "Thunderbolt" doesn't so much fly as it uses brute force to defy gravity. This brute force is echoed in the A47's twin, forward-facing, high-caliber machine guns with StrafeTrack™ technology for increased time-on-target and increased accuracy. Need even more time-on-target? Powerful engines and tilt-wing design combine with M&S's lowest-yield repulsor drive to date, making the A47 capable of extremely low-speed hover and pureVERTICAL™ take off and landing.*

* Professional pilot in closed airspace. Take off and landing within 10 degrees of perpendicular.

I feel I'm starting to get the hang of building at this scale. There's lots of neat little tricks I've learned from the Mobile Frame Forge and MF0 Flickr galleries, and there's always somebody doing something new/inventive with parts. My goal is to get three distinct sets of frames built up, slap together some terrain, and then start learning the game in earnest. It looks like a fun little system, and who doesn't like the idea of having a battlefield literally littered with the blocky remnants of their enemies forces?

Saturday, April 14, 2012

miscellaneous: battlefoam

Back in November I took advantage of Battlefoam's Black Friday sale and ordered up a whole mess of custom foam for various projects. Last Friday, it arrived.


Two trays of custom-sized foam, two trays of Battlefoam-sized foam, and eight trays of Spartan-sized foam snuggly packed inside a new Spartan Bag. All the foam was custom-cut based on designs I sent them.

First we'll look inside the bag...


I used the Battlefoam Custom Tray Creator for my Dystopian Wars FSA foam. As you can see, it fits the models well and I added a little room for expansion of my forces.

The remainder of the foam in my "Spartan Games Bag Custom Load Out" bundle was designed for my Aeronautica Imperialis models and made from designs I mapped out in Illustrator and sent in as PDFs.


All 6 trays fit quite snuggly in the P.A.C.K. 216 I bought at Adepticon a couple years ago.


The Battlefoam-sized trays were designed using the Custom Tray Creator and laid out to fit all 2000 points of Iron Warriors I have planned in a single Spartan Bag. My only quibble here is that the "Vindicator" hole from the Custom Tray Creator is extremely tight at the dozer blade. While this'll help during transport, I worry about wear on the paint job as I pull the model in and out of the tray. We'll see once I've actually painted the damn things.

Last, but not least, is the custom-sized, custom-cut foam trays I had designed for Wizkid's Star Trek: Fleet Captains. The foam has been made mostly unnecessary in the latest printing of the game, as Wizkid's has re-jiggered the inside of the box to better support the models and cards without breakage. However, I'd already designed this thing up in Illustrator and paid for the foam, so I went ahead with it.


As you can see, some of the ships sit pretty low in their holes. I had Battlefoam send me the insides of the holes, and will likely pull out the wire foam cutter to make varying height bases in the bottom of each hole. As with the Aeronautica foam, I probably could've designed the holes a bit tighter, but this being my first experience with Battlefoam's foam, I played it safe rather than sorry.


The lid sticks up a 1/4" or so due to the foam's base. I think it's a small price to pay for the protection the foam offers.

My initial impressions overall are positive. The foam appears to be of high quality and fits most of the figures snug. All quibbles are based less on practical application than theoretical at this point. With one of the Fleet Captains foams winging its way to Los Angeles soon, and most of the other trays headed to Adepticon with me, we'll see how the models, and my impression of the foam, hold up.

Thursday, April 5, 2012

paint: iron warriors: polybolos beta

Got Polybolos Beta mostly finished late in March but didn't get around to posting until now. I also started in on the army's bases, but after a failure of a color palette they're all taking a long soak in Simple Green.

Painting this unit was more of a chore than either of the first two units. I don't think it was burn-out on the color scheme so much as having to paint such a laborious process on 5 more figures than previous. That extra 8-9 hours adds up quick when hobby time is running low and you've got other games/projects vying for your attention.


Polybolos Beta: CSM x11, plasma gun, las cannon (clickable)

Still need to fix the eyes (a failed experiment left them too dark) and address plasma and lascannon weapon glow, but I think those will be addressed at an army-wide level on completion. For now I need to keep the forward momentum going.


Polybolos Beta: squad shoulder-pad detail (clickable)

The plan is to give Polybolos Alpha the opposite half of the chevron on their left shoulder so I can tell 'em apart on the battlefield. Thematically, it effectively ties them together, as Ahnighito's Zigouilliers, (the CO and command squad to both Polybolos squads) have the complete chevron on their left shoulder.

Bases up next, likely followed up by a Rhino or two. I'd like to have at least one vehicle completed before I leave for Adepticon mid-month, but that may be wishful thinking.

Sunday, February 19, 2012

build: work-in-progress: iron warriors, pt. 10

It's been a couple months, but I've finally gotten around to building the third and final Rhino for my 2000 point list. Because it's the dedicated transport for the second of two Breaching Squads, it's virtually identical to the first.


Chelonian III & Scutum IX: Chaos Rhinos: dozer blade, havoc launcher
(clickable)

Like Chelonian before it, Scutum is magnetized for in-game use and ease of painting.


I also spent some time this morning figuring out my banner situation. After playing with several banners I had around the house and test-fitting a few from bits sellers, I settled on using a large, raggedy, WFB Orc banner for my trench-line "command squad" and hacking up the smaller, Space Marine Command Squad banners in a similar fashion for the subordinate squads. The top of the Astartes banners ended abruptly, so I topped 'em off with skulls. Unfortunately, this made the skull atop the Orc banner look plain, so I hacked it off and added a scarred helmet that's likely to be a bright, shining yellow when I paint it.


(clickable)

Next up: Two Chaos Vindicators. I've already got the hull assembly completed and have modified the driver's windows. Everything else is just fiddly detail work to make it look Iron Warriors-y.

Monday, February 13, 2012

paint: iron warriors: breaching squad ferrugo

Finished my second unit... (all images clickable to biggie-size)


Breaching Squad Ferrugo:
plague marines, plasma, flamer; champ w/ fist

I streamlined the sequence a bit (same colors, just re-ordered some steps so I'm not going back to the same pots) and kept a stopwatch running while I painted - took about 12 hours to do the squad. A little math averages me an hour-and-a-half to an hour-and-forty-five per figure, depending on the type of squad.


Both of the "Breaching Squads" in my list are technically Plague Marines, and while I think the shields help denote the Toughness increase and Feel No Pain well enough for most folk, I thought I'd amp up the rust and patina to give 'em a metallic "decay" look, just to help drive the point home. It's not quite as pronounced as I thought it would be, but I'm happy with it.

While I had the wife's camera to snap nicer pics than last time, I brought the Zigouilliers back out to help see the difference...


Breaching Squad Ferrugo & Ahnighito's Zigouilliers:
Plague Marines & Chaos Havocs, respectively

I plan to take the rest of the month off from painting to work on building/converting the last Rhino, both Vindicators, and the Dreads. I'll also be working on some custom Iron Warrior Rhino doors/front plates for The Freebootaz annual Toys for Tots army. In March it'll be back to the painting table with... whatever vehicle or unit gets me a fully-painted Combat Patrol for Adepticon in April.

Friday, February 10, 2012

paint: iron warriors: recipe

While painting up the Zigouilliers, I used my cell phone, a pencil and scrap of white paper to keep visual notes of what paints I used where. I plan to use these notes as my recipe for the rest of the army, with slight variations depending on troop type or squad. There's some short-hand in the pics, the key of which is here:
  • gtts: medical abbreviation for drops
  • H2O + FI: a 10:1 mix of distilled water and Liquitex Flow Improver
  • ETOH: 70% alcohol obtained from the drug store
  • zenithal: applied from above, as if coming down from a spotlight directly overhead

All models are primed white, and any non-stippled, non-wash colors were applied using a home-made wet palette.


Step 1: complete coverage


Step 2: moderate coverage


Step 3: light coverage
(clickable)


Step 4: heavy coverage


Step 5: leaving a good amount of the prior color


Step 6: only hitting the highlights
(clickable)


Step 7: all over wash


Step 8: anywhere you want black or plan to have hazard striping


Step 9: any parts you plan to "bronze"
(clickable)


Step 10: can leave prior layer in recesses


Step 11: highlight bronze areas with an eye towards zenithal highlighting


Step 12: cloth underarmour and any non-ribbed wires/tubes/cabling


Step 13: all ribbed wires/tubes/cabling
(clickable)


Step 14: wash over all underarmour, iron and bronze


Step 15: wash to all wires/tubes/cabling painted grey above


Step 16: highlight to all wires/tubes/cabling painted brown earlier, but not underarmour


Step 17: wash as described in picture
(clickable)


Step 18: thin wash to bronze areas, just enough for subtle patina
(clickable)


Step 19: first layer of any hazard stripes and skulls, as much or as little as you want


Step 20: highlight the hazard stripes, leaving a little of the brown showing
(clickable)


Step 21: zenithal highlight of hazard stripes


Step 22: over most of the eye lenses


Step 23: just enough to make the eyes pop


Step 24: 2nd layer to skulls


Step 25: final skull highlight


Step 26: wash over the hazard stripes to dampen their brightness
(clickable)


Step 27: a couple thin washes should darken the eye recesses and dampen the bone color nicely

It's a bit labour intensive, but there a couple spots I think I can switch around the color order to streamline the process. It's not quite the competition-level painting I originally hoped to achieve, but I think an entire army painted like this will be fairly stunning on the table. I'm confident enough in the look to enter it in GW's "Armies on Parade" competition once all is said and done.

But that's still a ways off. I've got 43 more dudes, 2 walkers and 5 vehicles to paint. I'm thinkin' "Armies on Parade" will be a 2013 kinda thing...

how-to: rivets

Seems like rivets are one of the eternal problems facing any hobbyist looking to branch into heavy-duty conversions and scratch-building. There are roughly seven gajillion different methods to riveting your models, and I've tried at least 10 of 'em. Because my last two 40K forces have had rivet-intensive conversions (emORKgency! and Iron Warriors), I've developed a healthy respect for Grandt Line's line of "Augmentables." There are several useful bits throughout that page, particularly for Big Meks, but for those seeking your standard rivets, you'll need to go all the way to the bottom of the page.

Now, unless you've got a model railroad background, the scales and measurements on that page will probably have you scratching your head in confusion. The first time I saw the page I had no clue what I was looking at. Particularly how to convert the scale and real-world size of the item into something useable.

"Just how big is a 1/4" scale 1" square nut with bolt?"
"Oh. 0.021 inches!"
"Wait... How big is that"

I went with the trial-and-error approach with my first order. I got a smattering of sizes and here's what I've found - when ordering, look at the shape to figure out what you want, then look at the column labelled "Meas. (inches)" to figure out if they've got it in a size that'll work for you. Rivet #154, 0.043", is approximately the same size as the rivets on most GW kits, and the one I've been using on all my Iron Warriors conversions. The smaller bitz tend to look real small real quick and are only good for the fiddly-est pieces of kit - engines, infantry equipment, etc. For vehicles, stick to anything 0.043" and bigger.

I don't have any of the tinier bits handy, but here are a few of the Augmentables from my recent order:


Grandt Line Rivets, Nuts & Bolts (click to zoom)

As you can see, they come 20-35 rivets/nuts/bolts per sprue and there are 5 sprues in each $3.00 pack. Coupled with their ease of use, they really can't be beat. Speaking of ease of use, I snapped some quick shots of how I use them.


Materials: model, glue, rivets, drill w/ 1/32" drill bit, hobby knife


Step 1: drill holes where you want rivets


Step 2: cut some rivets off the sprue


Step 3: put a tiny dab of glue over a few holes
(use a thin glue to avoid "glue bubbles" around the rivet)


Step 4: use sharp edge of hobby knife to place rivets in holes


Step 5: position the rivet flush with no drill hole showing


Step 6: fill all your holes


Step 7: use up all your rivets


Step 8: order more rivets

They're stupidly easy to implement, more consistent than any "home-made" rivets I've ever tried, and having them drilled into the model makes them far less likely to fall off your model from rough handling than any of the "glue to the model's surface" rivets I've used. For Orkz, I use a variety of sizes and shapes, usually switching up the spacing and rivet type between armour plates to give it that haphazard, sons of Gork & Mork feel. For Imperials, I find the regular rivets work wonders and try to keep consistent spacing throughout to give it that mass-manufactured look.

Hope some of you find this useful, and happy riveting!