Showing posts with label hobby. Show all posts

Saturday, August 17, 2013

miscellaneous: organizing the kanban way!

After listening to episode 82 of The Independent Characters and hearing Carl extoll the virtues of Kanban flow, the organization system piqued my interest.

However, when it comes to organization I'm a more tactile kinda guy. I enjoy the physical act of scratching items off a list. I don't get the same feeling when I delete an item off a grocery list on my iPhone. With that in mind, and several materials already on hand, I made this...

To solve the problem of sub-tasks, I've divided each column into stages, denoted by what color pin is holding the card. The column header also has pins as a key. For example, the Zombicide Runners, Walkers and Heroes are ready for the final stage of PREP, they're ready for priming. My sections are:

  • PREP - Wash, Assemble, Prime
  • 3-COLOR - Skin, Clothing, Weapons
  • DETAIL - Highlight, Shadow, F/X
  • BASE - Build, Paint, F/X
  • RECORD - Photo, Edit, Blog
  • COMPLETE - Admire, Beer!

Different games have different colored cards. Currently the purple cards are for SAGA, pink is Dreadball and blue is Infinity. The yellow cards are board games. I switch up the color of Sharpie to denote which cards are from different factions or board games - thus "Marauders" is written in green and "Robots" is written in black.

So far, it's working well. I only bothered to make cards for the stuff that's fresh in my mind and it's driven home just how many models I've got sitting around, doing nothing. None of my 40K, Flames of War, Privateer Press or Malifaux figures have cards yet! Hopefully, it'll be the motivation I need to stay on task and get some of these models ready to show off in the light of day.

Friday, February 10, 2012

how-to: rivets

Seems like rivets are one of the eternal problems facing any hobbyist looking to branch into heavy-duty conversions and scratch-building. There are roughly seven gajillion different methods to riveting your models, and I've tried at least 10 of 'em. Because my last two 40K forces have had rivet-intensive conversions (emORKgency! and Iron Warriors), I've developed a healthy respect for Grandt Line's line of "Augmentables." There are several useful bits throughout that page, particularly for Big Meks, but for those seeking your standard rivets, you'll need to go all the way to the bottom of the page.

Now, unless you've got a model railroad background, the scales and measurements on that page will probably have you scratching your head in confusion. The first time I saw the page I had no clue what I was looking at. Particularly how to convert the scale and real-world size of the item into something useable.

"Just how big is a 1/4" scale 1" square nut with bolt?"
"Oh. 0.021 inches!"
"Wait... How big is that"

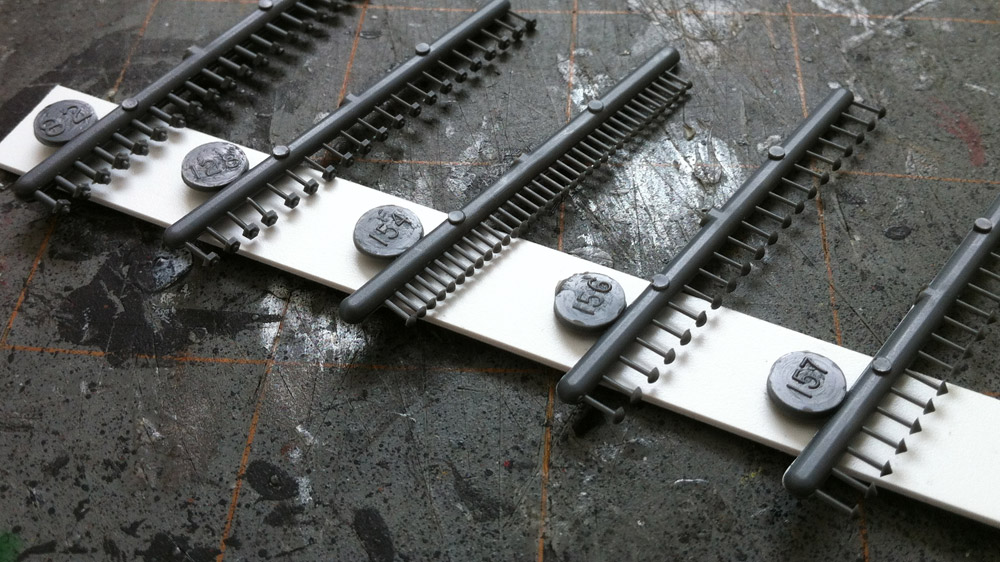
I went with the trial-and-error approach with my first order. I got a smattering of sizes and here's what I've found - when ordering, look at the shape to figure out what you want, then look at the column labelled "Meas. (inches)" to figure out if they've got it in a size that'll work for you. Rivet #154, 0.043", is approximately the same size as the rivets on most GW kits, and the one I've been using on all my Iron Warriors conversions. The smaller bitz tend to look real small real quick and are only good for the fiddly-est pieces of kit - engines, infantry equipment, etc. For vehicles, stick to anything 0.043" and bigger.

I don't have any of the tinier bits handy, but here are a few of the Augmentables from my recent order:


Grandt Line Rivets, Nuts & Bolts (click to zoom)

As you can see, they come 20-35 rivets/nuts/bolts per sprue and there are 5 sprues in each $3.00 pack. Coupled with their ease of use, they really can't be beat. Speaking of ease of use, I snapped some quick shots of how I use them.


Materials: model, glue, rivets, drill w/ 1/32" drill bit, hobby knife


Step 1: drill holes where you want rivets


Step 2: cut some rivets off the sprue


Step 3: put a tiny dab of glue over a few holes
(use a thin glue to avoid "glue bubbles" around the rivet)


Step 4: use sharp edge of hobby knife to place rivets in holes


Step 5: position the rivet flush with no drill hole showing


Step 6: fill all your holes


Step 7: use up all your rivets


Step 8: order more rivets

They're stupidly easy to implement, more consistent than any "home-made" rivets I've ever tried, and having them drilled into the model makes them far less likely to fall off your model from rough handling than any of the "glue to the model's surface" rivets I've used. For Orkz, I use a variety of sizes and shapes, usually switching up the spacing and rivet type between armour plates to give it that haphazard, sons of Gork & Mork feel. For Imperials, I find the regular rivets work wonders and try to keep consistent spacing throughout to give it that mass-manufactured look.

Hope some of you find this useful, and happy riveting!

Monday, August 29, 2011

miscellaneous: paint stands drawing to a close

Spent most of this week's hobby time finishing up the Orky paint stand commissioned by a local gamer. While I'm happy to provide the service, I severely underestimated, and undervalued, my time. With 13-14 hours into it when all is said and done, we're looking at about $3.35/hr! Not even half minimum wage! I'm still up to popping these out for folks, but I'm pretty much out of the Ork-style paint stand business unless I either cast the front-plates (downside: each is no longer unique) or I jack the price way, WAY up.

Unlike last update, I shall provide pictures!


Grandstand

Completed this one a couple weeks ago, but forgot to take pics. It's a bit barren 'cause I didn't have enough of any particular iconographic bits to decorate it up for a distinct army. Thought about stenciling in some numbers between panels, but ran out of steam. The hazard stripes were less to provide visual interest (which they do), than to provide practice for a soon-to-be-blogged project relevant to my interests.


Trenchworks

Did this one 'cause I needed to decorate up the dropper-bottle stand I pioneered in this post. Oddly enough, as I was finishing this one up a friend asked if I could do up a Death Korp of Krieg-themed paint stand for him. I showed him this one as proof of concept and he loved it. His will be a bit more involved (earth showing through the boards, lasguns and battle detritus, etc.) but probably won't be started for at least a couple weeks.


The lot of 'em!

Have a couple undecorated stands in there, but no desire to make 'em look pretty at present. Too inspired by real hobby projects at the moment. I'm sure I'll come back to 'em the next time my hobby batteries need a recharge.


Orky Commission: 90% painted

Just need to add a little freehand to the stand on the left, decorate the Rhino doors in Ultramarines and/or Space Wolves colors, and arrange delivery/payment. It'll have to be this week. Not because the client requested, but because the proceeds are going towards Space Marine on the Xbox 360 next week. Which is where I spent my hobby time Tuesday night/Wednesday morning. I wasn't as enamored with the demo as some of my friends, but I liked it well enough to walk into Best Buy and pre-order it the next day - Emperor's Children and Iron Warrior skins were too good to pass up. You know what they say:

"Iron Within! Naughty Bits Without!"

Thursday, August 18, 2011

miscellaneous: of commissions, funding, and combat patrol

Sorry to not have any pics to post lately. I've picked up a couple extra shifts at work, as well as a couple commissions for paint stands that have been absorbing my hobby time. The good news is that the commissions should help fund my next big project: a 400 point 40K force for Adepticon 2012's Combat Patrol. What that Combat Patrol consists of has yet to be finalized, as I'm in full-on research mode at the moment.

The only 40K-dedicated forum I frequent is The Freebootaz, the "Official Forum of 40K Radio." I joined back in 2009, just as Spencer and Phillip were getting off the ground and found the ass-hattery-less environment of a paid forum much to my liking. Over the years I've come to know and love the guys on the forum, regardless of my shifting feelings towards the Podcast, and look forward to the annual pilgrimage to Chicago to hang out with my "annual best friends from the internet." The Freebootaz have an unofficial thing going where as many of us as possible will be crafting Combat Patrol armies, with special kudos to those theming their armies for the Badab War. For that purpose, I've been researching the Minotaurs and Carcharodons Space Marine chapters. I like the former because they're less popular, have a wealth of Greek iconography to pull from, and have a distinct distaste for the Ultramarine gene-seed. I like the latter because I have some assembled models that would fit their aesthetic nicely, saving me both time and money. Unfortunately, neither chapter's fluff is compelling enough to give either faction an edge. There's also a third contender waiting in the wings...

The third contender is, of course, the Iron Warriors. I say "of course" because I've had them percolating in the brain-stew since doing the graphic design work for the Iron Warriors Minidex that "Axinous" released earlier this year. At Adepticon 2011 they were fresh on the brain and I managed to pick up some Mk.III Iron Armour, Phobos pattern bolters and an Iron Warriors Dreadnought from the ForgeWorld booth. Theoretically, this would be the cheapest army to implement at this time, as I have most of the components already on hand. Unfortunately, it's damn tough to come up with a 400 point Combat Patrol list using Codex: Chaos Space Marines. Their basic troops are too expensive, and their most effective and/or most thematic units don't meet the rules of Combat Patrol (2+ saves, front armour 14, etc.). Despite all this, and as much as I want to join in the Badab shenanigans, the Iron Warriors are the army I've been giving the most thought to of late.

As with the Dystopian Wars stuff of the past couple months, I plan to update in earnest with whatever power armoured force(s) I decide to assemble. I'll also put up some pics of a couple more finished paint stands as I finish the commissions mentioned earlier in the thread. Turns out I severely misestimated my time and their getting the labour dirt cheap. Live and learn, I suppose.

Saturday, July 30, 2011

build: paint stands, now for dropper-bottles!

Had a request for a blueprint for Vallejo/dropper-bottle sized paints. I tried to use as little wood as possible while remaining sturdy enough to hold paints. I've managed to use just three pieces of wood to make a five-tiered shelf holding 40 paints for just $7. I've built in 1/8" wiggle room per level for decoration/facades. If you want to go simple-and-easy, you can just grab some 1/8" square plastic or wooden rod, cut it to size, and glue it to the front edge of each level and call it a day.


Paint Stands, Mk.Ib: multi-colored "blue"print
( click to download PDF )


Mk.Ib: front (with Mk.II for scale comparison)


Mk.Ib: back

Not entirely sure how I'm gonna decorate this one yet. Might go steampunk with it...

Sunday, July 24, 2011

build: work-in-progress: paint stands, step-by-step

So it turns out that the two paint stands I built were about 13 spaces shy of holding all the Citadel and P3 paint pots I currently own, much less the colors I'll be adding as needed. With that in mind, I started work on a couple new stands using the same blueprint. I changed the assembly steps a bit to make the process faster/easier and, this time, tried to document the process in a meaningful way.


Step 1: Cut and assemble your pieces


Step 2: Glue the 1/2" bars to the underside of each platform


Step 3: Pair the platforms, glue them together


Step 4: Glue the paired platforms together


Step 5: Glue your horizontal and vertical braces in place


Step 6: Decorate to taste

I've tried to get creative gussying up each base, partially to see what I can do, partially to show that there's as many options as are there are thoughts in your head. Experiment, play, and have fun. I'll end with some completed shots of the first two paint stands. I hope to have the next two (stonework and grandstand) finished by this time next week.


Ork


Tom Sawyer


In Situ

I'd forgotten I had some of the old, hexagonal Citadel paint pots. They don't fit quite as well and overlap about 1/16" on both sides of the stand. If you've got a ton of those old pots, you may want to add 1/4" or so to the width of your stands.

Thursday, July 21, 2011

build: paint stands, complete with blueprints

Finished decorating my Citadel/P3-sized paint stands yesterday while the kids napped. I went for two different looks, partially to show off what can be done cheaply/easily to make 'em look unique, and partially because I got tired of fitting and weathering plasticard. The armor plates and fencing, besides being decorative, work to keep the paints in position those days I need to move the stands from my shelf to the painting desk.


Paint Stands, Mk II: front


Paint Stands, Mk II: back

If anyone wants to have a go themselves, the blueprint PDF was finished this morning. Should print nicely on one 8.5" x 11" sheet of paper, and I've color coded the pieces to be as self-explanatory as possible on that single sheet.


(right-click to download)

Not that I didn't take a few "in-progress" photos. Unfortunately, they're less of a how-to assemble and more of a treatise on using what you have available to hold your project together as the glue dries...


The blueprint has a built-in allowance for decoration the width of your standard popsicle stick - about 1/16 of an inch. You could just as easily forego the decoration and stick some 1/16 wooden or plastic rod on the front edge of each level to hold your paint in place. That's what did along the back edge of the top level.

The armour plated stand is primed black and the plan is to slap some paint on it while the kids nap today. I'll take some pics of the paint-in-progress as I plan to use my standard method for painting run-down Ork vehicles. As for the smaller "fence" rack, I'm gonna have a look 'round to see if I have any wood stain lying about. If not, I wonder if I can Tom Sawyer the twins into whitewashing it for me...

Sunday, July 17, 2011

build: work-in-progress: paint stands

As I prepare the remaining aspects of my "Summer of Spartan" - finish the sea table, make more islands, paint my remaining FSA - I find myself running out of space in my hobby room. I've rearranged things to create more room, but still find myself sitting on the floor instead of at my desk. As part of the reorganization process, I've come to the realization that I need more paint stands. The ones I made years ago when I used Vallejo exclusively are no longer cutting it for my growing collection of Citadel and P3 paints.


Paint Stands, Mk I: fit Vallejo paints like a glove

As you can see, they work great for dropper-bottle paints. However, the bigger form factor of the Citadel and P3 ranges gets problematic with my initial design. I'll do a how-to with "blueprints" later this week as time permits, but here's a glimpse at the current state of the project.


Paint Stands, Mk II: built for burlier paints

When all is said and done, they'll hold 36 paints and be a screaming ode to my inner MekBoy. (Despite the flood of Dystopian Wars material since this blogs inception, my first love of wargaming is, and likely always will be, the Orks of Warhammer 40K.) Not bad for about $10 worth of wood and some scrap plasticard.