Friday, February 28, 2014

flashback friday: supashokka dakkawagon

A few weeks back, I was rummaging through several old and/or incomplete projects and thought it might be nice to try and record them all in one place. Once a week, I'll try to dredge up an old project to share on here and reminisce. Next up, the Supashokka Dakkawagon!

WHAT WAS IT THEN?
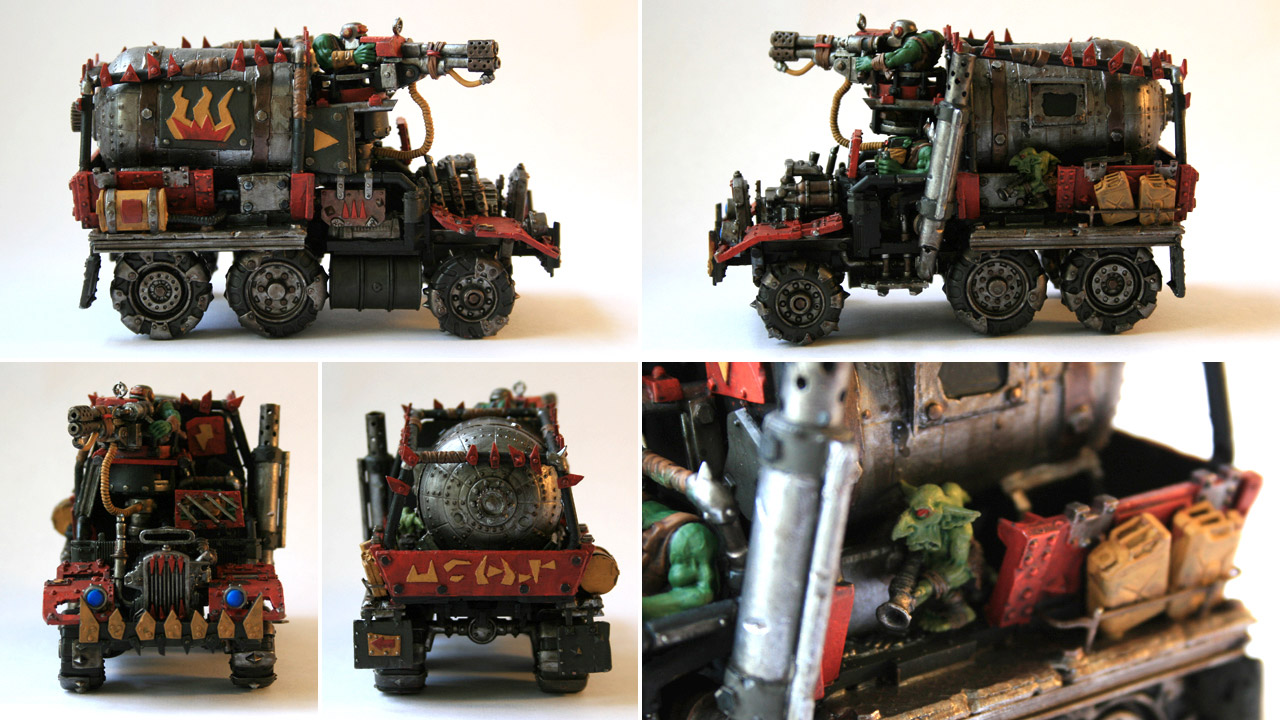
I created this beast back in 2009 for a Battlewagon Konversion Kontest on Da WAAAGH Forums. It was originally envisioned as a giant, multi-tiered, single-chassis flatbed vehicle in service to a massive cannon - a wheeled, Orky version of a German railway gun. Thankfully I never quite got the chassis to match the vision in my head, because what I ended with was a mobile fire base on steroids pulling an Apocalypse-sized Shokk Attack Gun on a ridiculously tiny gun carriage. It's one of the most succinctly Orky creations I've ever made.

The Supashokka is made from a plumbing fitting found at the local hardware store. I took it apart, reversed the tube, and slapped half an M&M container on the end of it. I then added various bits, plasticard and wires 'till it looked suitably crazy. The carriage is entirely scratch-built above the treads, has a magnetic "trailer-hitch" for attaching to the Dakkawagon, and allows the Supashokka to rotate horizontally and change elevation.

The Dakkawagon is actually my favorite part of the piece. It's just so beefy and dakka-laden that I can't help but fall back in love with it whenever I pull it off the shelf. It's armed with four Big Shootas, two Rokkit Launchas and three Zzap Guns. It's like a mini battleship. In fact, I've never called the front ram section anything besides a prow, and it's magnetized to be removable for transport/storage.

In the four years since I built the thing, I've lost track of all the little easter eggs and references I put into the Supashokka Dakkawagon. It's juvenile, but the one that stays with me is the hand-glyph behind the gunner and the license plates that read, "Two in the Waaagh, One in the Warp"

The Supashokka Dakkawagon actually hit the tabletop once in an Apocalypse game using a data sheet of my own devising. I honestly don't recall how well it performed, but I remember having fun with it.

WHAT DID I LEARN?
I learned the importance, particularly with Orks, of letting a build flow organically. I can honestly say that, aside from the big gears holding up that piece of plumbing as a cannon, the final result looks nothing like what I originally envisioned. The gun carriage, the prow, the placement and configuration of the weapons all just happened as I tried to balance things to my aesthetic.

Coming in 2nd in the competition, I also learned a little humility. There were some fantastic builds I was up against and there are several builders on Da Waaagh that should be designing kits for a living.

WHERE IS IT NOW?
Sitting, primed black, on the highest shelf above my desk. Digging it up in pictures made me realize what a great test bed it could be for several air brushing and/or weathering techniques. When I get serious about learning how to use weathering powders, I know the first model I'm looking to.

Friday, February 21, 2014

flashback friday: malifaux: the body thieves

I recently found myself rummaging through pictures of several old and/or incomplete projects and thought it might be nice to try and put them all in one place. To this end, I'll try to dredge up an old project once a week to share with the world and reminisce. Next up, my McMourning crew for Malifaux!

WHAT WAS IT THEN?
In May of 2010 I was riding a painting high from all the classes I took at Adepticon. One of my favorites was taught by James Wappel and his wife, who were among the nicest people I've ever met. They were enthusiastic and encouraging to all of our efforts, even though our marble and tile bases were like finger paintings compared to their work. Having recently purchased a McMourning crew during the initial Malifaux hype, I saw a happy convergence of newfound knowledge with desire to paint - put the mortician and his crew on tiled morgue bases!

I purchased some clay, a craft pasta machine for flattening it out, and a scribing tool for making the tiles. With the right tools, crafting the tiles was quick and easy. The hardest part was digging a hole in McMourning's base and crafting a making a convincing drain cover from plasticard. Painting the tiles was also pretty quick, as I did it before I applied the figures.

With the figures, I tried several new-to-me techniques. The first of which was painting white. I'm still not great at it, but the clothing on McMourning, Sebastian and the nurses came out better than I had any right to expect at the time.

This is also the first time I tried focused washes designed to do more than just make areas darker. I purposefully used purple and blue washes on the resurrected dogs and flesh construct to try and simulate pooled, deoxygenated blood. I think it worked particularly well on the pug. The chihuahua got markings to match my wife's own yappy-dog, Chili.

The flesh construct was a failure of the same washing technique. Using the same blue/purple washes over pale flesh tone didn't look re-animated dead, or even sickly, it just looked bad. I refused to strip the model, so tried to cover it up with some pale blues. It doesn't work, as it's poorly executed and you can see bits of the original flesh through it, but it does look better than it had.

WHAT DID I LEARN?
I learned to push myself and my painting, and that it's okay to miss the mark as long as you learn and improve on where you were before. At the time I painted them, these were the level-best I'd ever done and I was pretty proud of 'em. Not only because it was the first field-able "army" I ever finished, but because I think I carried out a well-developed, cohesive color scheme that identifies the individuals as part of a whole.

WHERE ARE THEY NOW?
Like most of my small-batch, painted miniatures, they're on the display shelf in my room. I never did get to field them. Malifaux was a flash-in-the-pan locally and while I was busy painting them, the gaming group had found the "most broken" combos and dismissed the game.

I'm looking forward to checking out Malifaux 2.0, and perhaps getting them to the table then. If not, I'll always have fun looking at this little guy...

Tuesday, February 18, 2014

paint: iron warriors: all my base...

are belong to finished!


Iron Warband Bases: all 8 units worth

The two 60mm bases are for my Chaos Dreads (Helbrutes). The top row is for my Chosen unit. The two below that are for each breaching squad. The two big blocks at the bottom are for the identical CSM squads, while the bases between them are for the Havoc squad that "leads" them.

Spent the last few hobby sessions partially as a break from painting armor, partially as a procrastination tactic on some Dreadball conversion work I seem to have lost my sculpting mojo for. Because of some failed starts in 2012, I had no clue how I was going to paint them, I only that I wanted to include green at the recommendation of one of the painting friends I look most up to. I decided on a mix warm and cold colors partially to experiment with something new and partially to help compliment the figures instead of compete with them. I realize the colors start to look a bit unnatural, but I still dig 'em anyway.

The base red-brown was airbrushed, then dry-brushed with a couple different shades of blue-green. The metals were glazed multiple times with various brownish reds and oranges 'till they looked rusty, and the rocks/concrete/wood got various green washes. I like the colors as a whole, and I like them with the test mini I kept holding up during painting. However, I'm a little apprehensive about how they'll compliment the army as a whole. We'll see when I start putting gluing the two together later this week.

miscellaneous: dragon forge designs

Back when I started the Iron Warriors I envisioned them on an “Armies on Parade” style display with defensive troops firing from trenches while the assault elements storming forward to breach the walls. With that in mind, trench-line and/or rubble-strewn bases were a must. Unfortunately, I was spending so much time and creative energy on building the troops and vehicles that I had little left for basing. I decided early on to see if I could find third-party bases that would fit my vision.

Now, I had shopped resin bases before. I'd even used them on my "Do-It-Yourself Space Marine Company" project a couple years earlier. My biggest problem then, and to be honest still is, that most companies only offer 10-20 troop-sized bases in a given style or range. Not a problem for your smaller skirmish games like Malifaux or Infinity, but when you're putting 50+ basic infantry on the table, the cooler, more characterful, and more intricately detailed your base is, the more easily you and your opponents will recognize repetition. That cool base with the busted statue head is awesome, but loses its luster when it's in every squad. You can mitigate this by going with a company's less detailed, more generic bases… But where's the fun in that?

I kept finding bases that could work, but no single company had a range big enough to avoid the dreaded repetition. That is, until I looked at Dragon Forge Designs. On initial glance, I should have been turned off by the standard 10-20 bases per range. However, unlike most their competition, they had several ranges with a bit of aesthetic overlap. As I looked through their catalogue, I realized I could probably mix and match multiple sets in a way that maintained both unit theme and army cohesion. With a plan in mind, I ordered bases from the Desert Wasteland series (RBDW-001, RBDW-002), Wasteland II series (RBWL2-001, RBWL-002, RBWL2-005, RBWL2-006) and the Urban Rubble series (RBUR-003).

When they arrived, I was impressed with the casting. Crisp details with no discernible bubbles in the “face” of the base. They come exactly as advertised.


Dragon Forge 25mm Bases: store's (l), mine (r)


Dragon Forge 60mm Bases: store's (l), mine (r)

Aside from a few minor quibbles with large pieces of easily removed flash and bubbles on base rims, also easily fixed, I have no complaints. At a price point of $1 each for the 25mm, these bases are a steal. $5 a pop for 60mm bases is less of a steal, but completely reasonable if you need 60mm bases to match the aesthetic of the smaller offerings.


minor quibbles

I had used the pics from the site to make a tentative plan as to what units would get what bases. It worked, for the most part, with only a few minor changes to balance ratios of detail.


Dragon Forge Bases: laid out by squad for my Iron Warriors

I painted up a few of them back in 2012 trying to come up with color schemes. They paint up easily and take to washes and dry-brushing well. Because I never found a color scheme I liked, I can also tell you that they’ll need a couple dunks in Simple Green before you can strip them fully. This isn’t a fault so much a testament to Dragon Forge’s detail.

I’ve painted them all “for reals” now (post coming soon) and a quick look at the site shows Dragon Forge's prices are still good with new bases in some of the lines I've used! I'll happily be ordering from Dragon Forge later this year when I expand the army. I’ve already got my eye on some 40mm bases...

Friday, February 14, 2014

flashback friday: armored krumpany: support trukks

I recently found myself rummaging through pictures of several old and/or incomplete projects and thought it might be nice to try and put them all in one place. To this end, I'll try to dredge up an old project once a week to share with the world and reminisce. This week, we finish out the Armored Krumpany!

WHAT WAS IT THEN?
As detailed last week, the Armored Krumpany was my attempt at Orkifying the Imperial Guard's "Armored Company" rules. Tanks were the back-bone of the army, to be sure, but the supplemental rule-set also featured armored fighting vehicles in support roles. Most of these support vehicles were based on the stalwart, mutable Chimera chassis, which sees use as a troop transport, mobile artillery cannon, giant flame-thrower and missile launcher. To that end, I got to work kit-bashing the new (at the time) Trukk kit...


Belcha: final work-in-progress shot

First up was "The Belcha," an Ork equivalent to the IG Hellhound. Using multiple types of plasticard sheet, I-beams, rods and tube, along with various Ork bits and a smattering of non-GW kit, the intention was to make a relatively fast-moving, flame-spewing, death machine.


Belcha: painted


Belcha: details (clickable)

While I made the rules for the flame-throwing cannon particularly nasty, I tried to balance that by giving it a nice, Orky weakness:

BELCHA
Capable of reducing whole squads of infantry to smoldering piles of ash and metal, Belchas are one of the most fearsome vehicles in an Armored Krumpany’s motor pool. Unfortunately, its light armor combined with its massive fuel cannister make it fearsome to the Orks as well.
 
Armor
BSFrontSideRear
Belcha2111110

WARGEAR
Belcha Cannon
: Essentially skorchas on growth hormone, Belcha Cannons are capable of spewing large gouts of liquid fire over long distances. To fire, place the flamer template over an enemy unit so that the whole template is in range and LOS while over as many models as possible. Roll to hit once. If successful, all models touched by the template are hit. If unsuccessful, each model is hit on a 4+.

SPECIAL RULES
Bada-BOOM!
: The massive fuel tank used to arm the Belcha Cannon makes the Belcha particularly susecptible to penetrating hits. When the Belcha is penetrated add +1 to the roll on the vehicle damage chart. This stacks with the +1 for being open-topped.

Building the Belcha just got me warmed up. With the back-story of the Armored Krumpany firmly rooted in a Big Mek lootin' his ideas off the battlefield, I figured he needed some way of draggin' back the big bits. I launched into the next support vehicle right away.


Wrecka: from above

Tanks and other armored fighting vehicles are at the forefront of any Armored Krumpany - both as fighting machines and as spoils of war. However, in it’s no easy task to recover conquered vehicles in the heat of battle. Without the Wrecka, damaged and disabled vehicles would be nothing more than battlefield debris. Born from a simple Trukk chassis, Wreckas have been retrofitted with hooks, chains, cranes, arms, magnets or other bits designed to transform debris into scrap, and bring it back as loot.


Wrecka: right and left

I gave it a super-sized "towin' engine" by keeping the engine halves separate and bulking out the space between. The headlights, one of my favorite single features on this build, are the searchlights from a Chaos Vehicle sprue sandwiched between two pieces of plastic tube. The towing apparatus in back was all from scratch, the chain coming from a dollar-store necklace.

Codex wise, a Wrecka was the dedicated transport for a Wreckin' Krew - a 12-strong Ork Boyz unit whose special rules (the ability to tow vehicles, including the enemies) was tied to the Wrecka.


Wrecka: details

WHAT DID I LEARN?
These were my first truly kit-bashed vehicles. They're where I started refining my plasticard skills and figuring out how to view model parts not so much as pieces of a puzzle, but as elements for a collage. With a sharp hobby knife, the right structural bits, and some glue, a given piece can become just about anything.

WHERE ARE THEY NOW?
Like may completed builds, they sit on a shelf in my hobby room. The Belcha on the shelf of painted and finished stuff. The Wrecka on the shelf of things I still need to paint. Looking at many of the pieces I have from defunct projects, I feel like many of them would make great test beds for honing various painting techniques. When I look at the Wrecka today, I see an opportunity to try out various weathering techniques - salt mask, oil washes, weathering powders - to approximate the look of a famous, dim-witted tow truck...

Wednesday, February 12, 2014

paint: update: iron warriors: sikhote's slaughterers and basing

Not much progress this week, as I worked the entirety of the weekend and watched the kids the other days of the week. But I was able to put the black down on Sikhote's squad, as well as the brown base-coat for the bronze.

I also managed to get all the bases completely stripped so I can burn through them all at once. Damon, one of my favoritest Adepti-Friends suggested green on the bases back in 2012, and I think I'm going to take it one step further by emphasizing a warm/cold contrast.


Ahnighito's Zigouilliers: bases in progress

I'm starting the dirt a deep red-brown and working up a couple different shades of blue-green. I couldn't get the colors in the pic to ring quite true enough, but they look a bit like oxidized dirt under moonlight. I still need to add detailing - dingy/rusty metals to the gears/girders, green-tinged grey to the rock and concrete, and neutral metals on the shell casings. It sounds odd, but I'm hoping the end result brightens the Iron Warriors a little and contrasts the minis in a way that helps the hazard stripes pop.

As usual, updates as progress warrants.

Friday, February 7, 2014

flashback friday: armored krumpany: krumpin' wagons

I recently found myself rummaging through pictures of several old and/or incomplete projects and thought it might be nice to try and put them all in one place. To this end, I'll try to dredge up an old project once a week to share with the world and reminisce. First up, the Krumpin' Wagons of "Codex: Armored Krumpany!"

WHAT WAS IT THEN?
Somewhere in the middle of 2007, when I was just dipping my toes into 40K, I got the idea to satisfy my inner Big Mek by looting the Imperial Guard's Armored Company and making a mini-Codex of my own. From the inside cover...

In the grim, dark future, a Mekboy slaved away building trukks, buggies, and koptas for a nigh-unstoppable embodiment of Gork - his Warboss. With a load of strength and a smidge of cunning, the Boss had ransacked the planet, destroying or mobbing up all the planet’s clans into a single green tide. His green tide. The day an entire battalion of mechanized ‘umie made planetfall, the Boss was ready. With a cry of “Waaagh!” so tremendous it shook the earth, the clan rushed forth ready for another great krumpin’.

As battle raged around him, the lowly Mekboy could not contain his excitement when a well-placed stikkbomb crippled the treads of a Leman Russ. He rushed to the tank and climbed inside, his wrench absently dispatching the crew as his mind boggled at the new technology. His world shrank as he focused on the shiny, new worky bitz, trying to fathom the orderly tangle of ‘umie engineering. He did not notice the dissipating thunder of his clan outside.

Climbing out of the Russ a day later, his pack full of gubbinz and good ideas, the Mekboy could just make out the silhouettes of ‘umie tanks and transports disappearing over the horizon. At his feet laid a sea of dead orks. Putting two and two together and somehow getting four, he decided that if the brute power of tanks could destroy the most powerful thing he’d ever known, then by Gork, he would have some of his own...

Unfortunately, I couldn't afford all the Leman Russ kits I would need for the project, so I went about figuring out how to make my own. Armed with a compound saw, basswood strips and some plasticard I was able to start churning out chassis.

Suitable turrets eluded me until I chanced upon electric plugs at the local hardware store. With a little work, I started churning those out, too.


Exterminator Turret | Eradicator Turret | Plain Turret

Slap on some bits and bobs for detail, nick and scrape it all up with a good hobby knife, and add lots and lots and lots of rivets, and you've got a "Krumpin' Wagon!"

Ultimately, I ended up with 9 Krumpin' Wagons, 3 of each turret type, before I moved on to other projects.

WHAT DID I LEARN?
Despite their simplistic nature, the wooden framework and hard plastic shell of the electric plug makes for a sturdy, resilient model. This project is also where I started working in earnest with plasticard. I figured out that the thick sheets are best cut by using a sharp knife, metal ruler, and multiple light scoring marks before they'll just snap apart. I developed a few different ways to weather the edges of plasticard plates. Scraping a sharp hobby knife along an edge, pulling the blade along the edge while constantly changing the angle of the blade, and multiple quick, sharp angled attacks each create a very different look that look great alone or when used on top of each other. This project is also where I started slicing off bits of plastic hex rod to make Orky rivets, a method that would be de facto standard until I started using Grandt Line rivets a few years later.

WHERE ARE THEY NOW?
One of each tank type was painted and donated to 40K Radio's annual Toys for Tots auction back in... 2009 I believe. Three more were given away as a Christmas gift the year after that. The other three I still have, unprimed, a few shelves above the one in the picture.

Thursday, February 6, 2014

paint: iron warriors: polybolos alpha

>Polybolos Alpha is done! I actually finished it the other day, but only had crappy cell phone pics 'till earlier this afternoon.


Polybolos Alpha (clickable)

They match Polybolos Beta almost perfectly. Makes me glad I took good notes a couple years ago when this project started!

Still need to do the freehand chapter insignia and finish the banner (saving those 'till all the infantry are complete), but I've gone ahead and completed the unit designations according to the original plan...


Polybolos Alpha | Ahnighito's Zigouilliers | Polybolos Beta

The idea behind these particular units is that all three are part of a larger whole. While the Zigouilliers are Veterans of the Long War, both Polybolos units are fresher recruits to the Iron Warriors cause, relegated to trench-line defense under Captain Ahnighito's command. Thus the Zigouilliers' full chevron is split on Alpha and Beta's pauldrons, each getting the left and right halves of the commanding unit's markings respectively.

I've also been making pretty good progress on the remaining infantry in the force...


Iron Palatine Gibeon w/ Breaching Squad Aerugo


Sikhote's Slaughterers

...getting each unit up to step 6 in the process. While it's been easiest to do the initial layers simultaneously up to this point, I'll be splitting 'em off from here on out. The plan is to finish one unit this month while devoting a significant portion of my hobby time to the projects I'm committed to for Adepticon 2014.

More updates as time and progress warrant!